

The wine bag, stamps and other supplies are included in the Homemade Holiday stamp kit. This is a very big kit with a lot of different gift packaging supplies.
Here is what you'll need for this project.
Supplies from Kit:
- Popcorn Tree, Pine Bough, and Charles Cardinal Stamps
- Wine bag
- Holly Jolly Stripe paper
- Maraschino, Leapfrog, Harvest and Announcement Cream cardstock
- Twill ribbon
- 2 green brads
Other Supplies:
- Copic Markers (or other means to color images)
- Paper piercer
- White Inkessential pen (or other white gel pen)
- Memento Rich Cocoa and Bamboo Inks (or other inks)
- Scallop Corner punch (optional)
- Tim Holtz Design Ruler (optional)
- Adhesive
Instructions:
Decorate the bag:

- Stamp the bag front and back with an all-over diagonal pattern using the Pine Bough stamp and green ink. Don’t worry if the stamping over the handles is not perfect – it will be covered.
- Cut 2 pieces of Stripe paper 3” wide to fit on the top front and top back of the bag – adhere. Cut ¾” wide strips and adhere to the bottom front and back as shown.
Create the pocket for the front:
- Stamp Popcorn Tree in Rich Cocoa on a 2 ¾” by 3 ¾” piece of cream cardstock and color as desired. Adhere to a red matte (3 7/8” by 2 7/8”).
- Cut Harvest 3 ¾” x 5 ¼”. Punch scalloped corners with the scalloped corner punch. Adhere the “L’s” to the lower corners of the Harvest piece. Reserve the other corners for the tag. Adhere the matted tree image inside the corners. If you do not have a corner punch, you can just cut corners from a square of cardstock and mount the matted image on top.
- Adhere a 5/8” strip of Stripe paper near the top of the pocket. Pierce around the outer edge of the pocket. I used the Tim Holtz Design Ruler. I love that thing! I know - its just a ruler but its so well thought out. Its become a favorite tool. Create “stitches” with the white Inkessentials gel pen.
- Adhere the pocket to the bag front on the sides and bottom. Add the two brads through the bag for extra pocket strength.
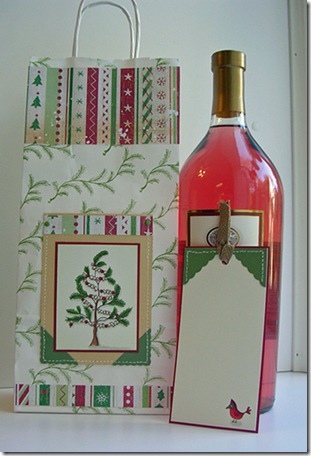 Create the Tag:

- Cut Cream 5 ¾” by 2 ¾”. Stamp the cardinal in the lower right corner and color. Adhere the scalloped corner punches reserved from above on the top corners. Create the “stitching” on the corners as above. Matte it on a 5 7/8” by 2 7/8” piece of Maraschino. Punch a hole between the two corners and add the twill ribbon.


6 comments:
Just one question: Did you make that gorgeous gift bag just for me? I LOVE it! (and it's contents).
Great project. That's my favorite of the Holly Jolly papers!
Gorgeous! I love the colours & the way the tag pulls out. How cool that the kit comes with so many great packages. Instant Christmas. :O) Your hostess is going to adore this!
I love that tag! You are soooo talented!
Simply Beautiful!!
Plus, I love the detailed instructions!
Robin
Great giftbag !! Thanks also for sharing how to make it, I will keep it in my notebook with "projects to make" ...
Post a Comment