I have moved!

Please visit the new and improved Paper Garden Blog. I'd love to have you stop by. Just click HERE

Wednesday, January 14, 2009

Visit the new blog cabin!

I have moved!!

Please visit me in my new home. Maybe we can have cocktails and do a little stamping.

Get there just by clicking HERE!

Please update your links and readers and such - as all the action will be at the new place.

(and thanks ever so much!)

Tuesday, January 6, 2009

On the Move....

iomoving Happy New Year everyone!

I hope everyone have a wonderful Holiday.  I know I have been a woefully neglectful of the blog and all my blogging buddies.

We did some traveling over the Holidays and I'm trying to pull life back together here (still need to take that tree down....). 

Also, I'm making some improvements to the Paper Garden Projects store website and this blog.  So this blog is being moved to a new home. 

Hopefully I'll have it all spruced up by the end of the week so I can invite everyone over for cocktails (OK... maybe just blog candy...).

About the card: I used the New Home Clear Set by Impression Obsession and Basic Grey Ambrosia papers.  Its colored with Copics (of course!).

Saturday, December 20, 2008

15 years? Oh my....

Anniv08 On the 18th, my husband and I celebrated our 15th anniversary.  Funny - I don't feel a decade and a half older! (well... OK, some days I do....).  A lot has happened in the last 15 years - but they have all been good ones.

This is the card I made for him.  It has cute little love birds, but I tried to use manly colors.  And the paper has wood grain - wood grain is manly right? 

I colored the images with Copic markers and paper pieced the tree top with the reverse side of the stripe paper (Cosmo Cricket Wanted collection I think).

The images are from Odd Bird planet.  Kelly's tree is available as part of the Relaxin' in Nature cling set and the love birds are in the Valentine Friends cling set.

I'm still frantically trying to finish Christmas projects.  Wish me luck!

Wednesday, December 17, 2008

Its almost too late to be early!

ecgsophie I love this image and the saying that goes with it!  These stamps are part of the Letter to Santa Cling set (the stamps are from Eat Cake Graphics - love that snowman too!).

I colored the image with Copics.  I was having a lot of trouble with my ink migrating outside my ink lines.  What's going on??  Then it dawned on me - I grabbed the paper I used from my scrap pile.  I have my favorite white cardstock  that I use with the Copics (its the cardstock in the store).  This was not it and it does not color as well.  The paper and ink combo really do make a difference in how easy and enjoyable it is to color with the Copics.  My favorite combo is Memento ink with the Wedding White or Announcement Cream cardstock in the store.

Well, I kept going (in spite of smudgy shoes) and cut the images out with my Spellbinders dies.  One of my favorite things to do is emboss the dies and then use my duster brush to ink the background edges with the die in place.  I really like the white border it leaves.

I hope everyone is having a wonderful Holiday season.   I'm frantically trying to finish up projects - teacher gifts and other things.  I still have some cards to make let alone send out!  How is it this Holiday always sneaks up on me? 

Holiday Stamp Kits are 40% off

While they last, the Holiday stamp kits are 40% off.  You can check them out here:

hhcontents

Homemade Holiday stamp kit


ghsupplies

Gnome for the Holidays Stamp Kit


Paper Garden Projects Shipping Schedule:

All orders placed before midnight Sunday December 21 will be shipped on December 22.  Any orders placed after December 22 will not be shipped until January 5.

We will be taking a little Holiday break to spend some time with our families.  I think you should too :)

Friday, December 12, 2008

There is still time...

ioxmastopiary The holidays are looming, but there is still some time to squeeze in a few more Holiday Projects. 

Right now, Holiday Stamp Kits and selected Holiday stamps, papers and stamp sets are on sale at Paper Garden Projects (while supplies last). 

You can check out all the specials by clicking HERE.  We ship priority mail, so US customers should have their purchases in about 3 days.

For this card, I used the Partridge in a Pear Tree Topiary cling stamp and the new Basic Grey Wassail paper pad

The image is stamped in Memento Rich Cocoa ink and colored with Copic Sketch Markers.  I added some glitter to the Partridge and the stars with the Copic Spica glitter pen - but the photo does not capture the glitter very well. 

I created the diamond edge with the Diamond elegance Border Punch and added a thin strip of the green paper from the Wassail pad that I pierced using the Tim Holtz Design Ruler.  If you like to paper pierce, this ruler is so great.

xmas-topiary-copicsOh.... in case inquiring minds want to know, there are the Copic colors I used for the card.  I also added a little R-14 to the bow, and I used colorless blender to create highlights on the bow.

I have a sick little one today (off the the doctors for a strep test).  But I hope to work on some of my projects later.  And.... I'm putting the finishing touches on the new kit for release mid January.  I likey!!  Hope you do too.

Thursday, December 11, 2008

Decorating a Gnome Home for Christmas

xmasgnomehome I decided the Gnome Home from Odd Bird Planet needed a little sprucing up for the Holidays.  I was in a bit of a goofy mood and my decorating went a little over the top, but I thought I'd share it anyway.

Here is my finished product.  I used a bunch of different Odd Bird Planet stamps in my little creation.  In case inquiring minds want to know - here's what I did.


xmasgnomehome1 First I stamped the Gnome Home in Tuxedo Memento ink.  Then I masked it with eclipse paper.  I inked around the image with Broken China Distress ink using a duster brush.  I did the top "sky" area darker than the bottom "snow" area.  (the green on the mask is from the last time I used it - I save them and reuse them so I don't have to cut stuff out again... can you say "l-a-z-y"...)


xmasgnomehome2 
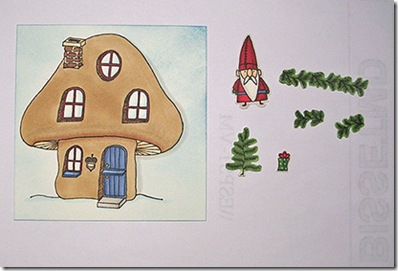
I colored my Gnome Home with Copic markers.  The mushroom cap is pretty big.  To avoid marker streaks, you need a well inked marker.  The trick is to color slowly enough to saturate the paper, but quickly enough to keep a wet edge on the ink.  Sometimes you need to move around a bit when you color to keep all the edges wet.  In large areas, I use the wedge tip of the marker because it delivers more ink.

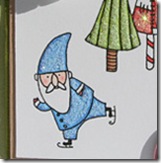
Then I stamped all my "pieces", cut out around them and colored them.  The stamps I used were Cathrine's Gnome HomeCathrine's Sapling, Cathrine's Sapling Branch, Kelly's Stiched Gnome, and Simple Gift.  The long garland is just Sapling Branch stamped side by side 3 times.

Generally, I don't try to cut right on the line of something.  (Its just too hard for me! LOL  there is that l-a-z-y thing again!).  I usually leave an edge around it.  You can see it on the gnome.  Before I cut him out, I outlined around him with W-1 gray so he wouldn't have a stark white border.  It makes cutting out so much easier and I think it makes cut out images stand out from the background.

BTW - for the gift, I created the dots by coloring the present green and then holding the tip of my blender pen where I wanted a dot after the green ink dried.  The blender fluid will push the green ink out and create a dot.

xmasgnomehome 
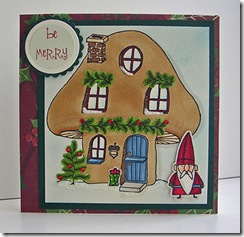
So then I just assembled.  And added those heaps of embellishments. 

I added red crystals on the tree and garland.  I also added some snow to the windows and ground using the puffy velvet marker.  On top of the velvet I added glitter!  I know - its a bit extreme - but it was fun!

And yes- we do have those gaudy multicolor lights on our tree - not the elegant white ones.  We have a mis-match of homemade and"historical" ornaments.  I mostly let the kids decorate it - so there are some branches with 3 ornaments hung on top of each other.  Martha Stewart would NOT approve - but it works for us.  Sometimes you just need to embrace imperfection.

Thanks for looking!  Happy Stamping.